Introduction
Achieving excellent first-layer adhesion is critical for successful 3D printing. Without proper adhesion, prints can warp, detach from the build plate, or fail entirely. This article provides a comprehensive guide to diagnosing and resolving filament adhesion problems, covering common causes, solutions, and material-specific considerations. At Printie 3D, we've seen firsthand how crucial a good first layer is to a successful print. This guide distills years of experience into actionable advice.
Common Causes of Adhesion Problems
Several factors can contribute to poor filament adhesion. Understanding these causes is the first step toward finding the right solution.
1. Bed Leveling Issues
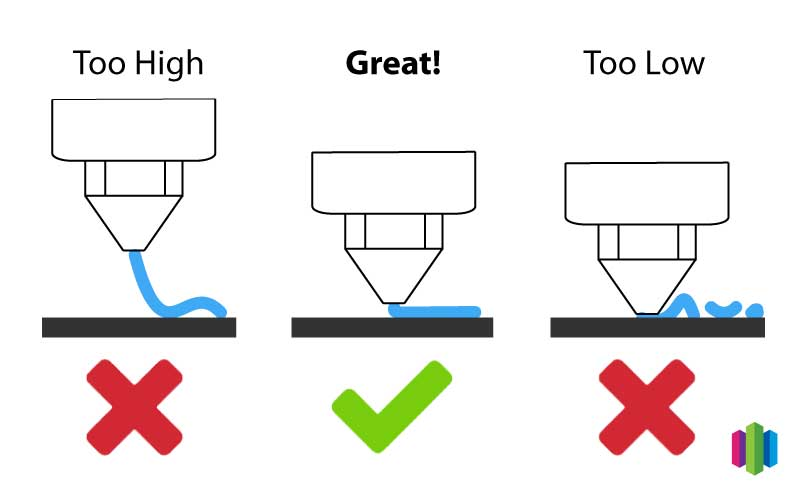
An unlevel bed is one of the most frequent culprits. If the nozzle is too far from the bed, the filament won't properly adhere. If it's too close, the filament can be squeezed too thin or the nozzle can even scrape the bed.
2. Incorrect Z-Offset
The Z-offset determines the initial distance between the nozzle and the build plate. Even with a level bed, an incorrect Z-offset can prevent proper adhesion. A Z-offset that's too high is functionally the same as an unlevel bed where the nozzle is too far away.
3. Inappropriate Bed Temperature
Each filament type requires a specific bed temperature range for optimal adhesion. Printing below the recommended temperature can prevent the filament from properly bonding to the surface.
4. Improper First Layer Settings
Settings like first layer speed, height, and width significantly impact adhesion. Printing too fast or with incorrect layer height/width can lead to adhesion failures.
5. Cooling Fan Settings
Excessive cooling during the first few layers can cause the filament to contract and detach from the build plate.
6. Dirty or Unsuitable Build Surface
A build surface contaminated with oils, dust, or debris can hinder adhesion. Similarly, using an unsuitable build surface for a particular filament can also cause problems.
7. Warping and Lifting
Warping occurs when the printed part contracts unevenly during cooling, causing the corners or edges to lift from the build plate. This is more common with materials like ABS.
8. Nozzle Health
A partially clogged, worn, or damaged nozzle can impede proper filament extrusion and first layer adhesion. A damaged nozzle may not lay down filament properly, and a clog can cause under-extrusion.
Solutions to Adhesion Problems
Addressing adhesion issues requires a systematic approach. Here are some effective solutions:

1. Bed Leveling
Ensure the build plate is perfectly level. Use a piece of paper or a feeler gauge to check the distance between the nozzle and the bed at multiple points. Most printers have manual bed leveling knobs, while some offer automatic bed leveling (ABL) using a probe. Remember to level the bed after it has reached its printing temperature, as thermal expansion can affect leveling.
2. Z-Offset Adjustment
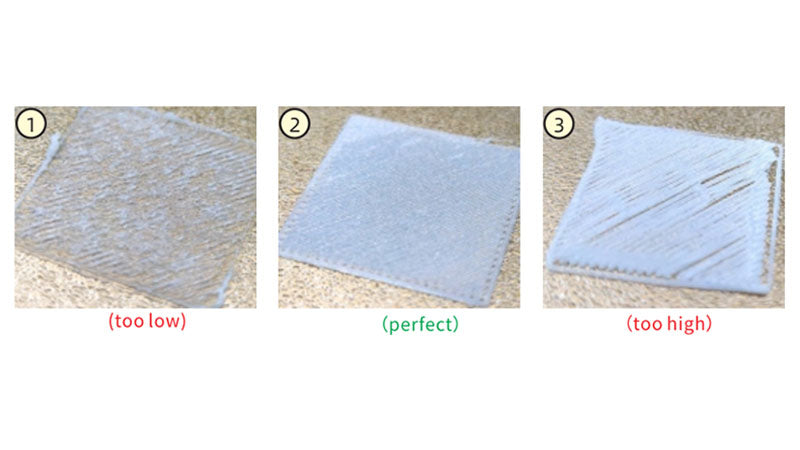
Fine-tune the Z-offset using the printer's control panel. Adjust the Z-offset in small increments (e.g., 0.01mm) during the first layer. The goal is to achieve a slight “squish” where the filament is slightly flattened onto the bed. A good test is to try sliding a piece of paper between the nozzle and the bed; you should feel a slight drag.
3. Optimizing Bed Temperature
Set the bed temperature according to the filament manufacturer's recommendations. Here are some general guidelines:
| Filament Type | Recommended Bed Temperature |
|---|---|
| PLA | 50-65°C |
| PETG | 70-85°C |
| ABS | 90-110°C |
| Nylon | 60-80°C+ |
| TPU | 30-60°C |
4. First Layer Settings
Adjust the following first layer settings in your slicer software:
- Speed: Reduce the first layer speed to 50-75% of the normal print speed (or even slower, around 20mm/s, for materials like ASA, PC, and PP).
- Height: Increase the first layer height slightly (e.g., 0.2mm or 0.24mm, even if the standard layer height is lower).
- Width: Increase the first layer line width to 120-150% of the nozzle size.
- Extrusion Multiplier: Increase the first layer extrusion multiplier to 95-105%.
5. Cooling Fan Management
Disable the part cooling fan for the first few layers to allow the filament to adhere properly. Gradually increase the fan speed after the first few layers.
6. Build Surface Preparation
Clean the build surface before each print using isopropyl alcohol (IPA). For PEI sheets, occasional deep cleaning with dish soap and water is recommended. Glass beds can be cleaned with window cleaner or dish soap and water. Avoid touching the build surface with your fingers.
7. Using Adhesion Aids
Apply an adhesion aid to the build surface to improve adhesion. Common options include:
- Glue Stick: Suitable for PLA and PETG.
- Hairspray: Often used for ABS.
- Magigoo: A versatile adhesive suitable for various materials and high temperatures.
- ABS Slurry: A mixture of ABS filament dissolved in acetone; used for ABS printing.
- Painter's Tape: Can be used for PLA and TPU.
Always apply a thin, even coat of the adhesion aid.
8. Enclosure and Draft Protection
Enclose the printer to minimize drafts and maintain a consistent temperature, especially when printing with ABS or Nylon. This helps prevent warping and lifting. Consider building a simple enclosure or purchasing a commercially available one.
9. Troubleshooting Warping and Lifting
If warping persists, try these additional steps:
- Increase the bed temperature slightly.
- Add a brim or raft to the print. A brim is a single-layer outline around the base of the print, while a raft is a multi-layer platform.
- Improve the ambient temperature around the printer.
10. Nozzle Maintenance
Regularly inspect and clean your nozzle. Cold pulls can remove clogs. If the nozzle is worn or damaged, replace it. A clean, functioning nozzle is critical for consistent filament extrusion and first layer adhesion. Learn more about high-precision nozzles.
Material-Specific Considerations
Different filaments require different approaches to adhesion. Here's a breakdown of material-specific considerations:
- PLA: Generally easy to print with good adhesion. A clean bed and a bed temperature of 50-65°C are usually sufficient. Glue stick can be used for added adhesion.
- PETG: Can adhere too strongly to bare glass, potentially damaging the build plate. Use glue stick or PEI for easier removal. Bed temperature of 70-85°C is recommended.
- ABS: Prone to warping. Requires a heated bed (90-110°C) and often an enclosure. Hairspray or ABS slurry can improve adhesion.
- Nylon: Can be challenging to print due to its high shrinkage rate. Requires a heated bed (60-80°C+), an enclosure, and a strong adhesion aid.
- TPU: Generally adheres well. A bed temperature of 30-60°C is typically sufficient. Painter's tape can be used to prevent excessive adhesion.
Build Surface Maintenance and Replacement
Proper maintenance of the build surface is essential. Clean the surface before every print. Replace the build surface when it becomes damaged or loses its adhesion properties. PEI sheets typically last longer than other surfaces, but they can eventually wear out. If you notice declining adhesion even after cleaning, it's time to replace the surface. Contact Printie 3D for help with surface materials.
Troubleshooting Flowchart
Here's a simplified troubleshooting flowchart to help you diagnose and resolve adhesion problems:
- Problem: Print not sticking to bed.
- Check: Bed leveling. Is the bed level?
- If No: Level the bed and try again.
- If Yes: Proceed to step 3.
- Check: Z-offset. Is the Z-offset correct?
- If No: Adjust the Z-offset and try again.
- If Yes: Proceed to step 4.
- Check: Bed temperature. Is the bed temperature appropriate for the filament?
- If No: Adjust the bed temperature and try again.
- If Yes: Proceed to step 5.
- Check: Build surface. Is the build surface clean and suitable?
- If No: Clean the build surface or try a different surface and try again.
- If Yes: Proceed to step 6.
- Consider: Adhesion aids. Have you tried using an adhesion aid?
- If No: Apply an adhesion aid and try again.
- If Yes: Consider a different adhesion aid or other issues.
Conclusion
Achieving consistent first-layer adhesion is a skill that improves with experience. By understanding the common causes of adhesion problems and applying the solutions outlined in this article, you can significantly improve your 3D printing success rate. Remember to consider material-specific requirements and maintain your build surface properly. With practice and attention to detail, you'll be printing flawless first layers in no time.