
Introduction
3D printing has revolutionized prototyping and manufacturing, allowing for the creation of complex geometries with relative ease. However, successful 3D printing relies heavily on properly preparing your 3D files. This guide provides a comprehensive overview of the steps involved in preparing your designs for optimal printing results. At Printie 3D, we understand the importance of a well-prepared file and offer services to help you through the process.
1. Understanding 3D File Formats
Choosing the right file format is crucial for compatibility and print quality. Here's a breakdown of common formats:

- STL (Stereolithography): The most widely used format, representing the surface geometry as a collection of triangles. It's simple but doesn't store color or texture information.
- OBJ (Object): Supports color and texture mapping, making it suitable for visually rich models. It represents geometry as vertices, edges, and faces.
- 3MF (3D Manufacturing Format): A modern format designed specifically for 3D printing. It stores model data, material information, and print settings in a single file.
- STEP (Standard for the Exchange of Product Data): Commonly used in CAD software for representing solid models. It's precise and suitable for engineering applications.
- IGES (Initial Graphics Exchange Specification): An older format similar to STEP, also used for CAD data exchange.
Recommendation: For most 3D printing applications, STL is a reliable choice. However, if you need to preserve color or material information, consider using OBJ or 3MF.
2. Mesh Quality: Ensuring Watertight Geometry
A watertight or manifold mesh is essential for successful 3D printing. This means the model must be a closed volume without any holes, gaps, or overlapping faces. Non-manifold geometry can lead to errors during slicing and printing.
Identifying Mesh Errors
- Visual Inspection: Carefully examine the model for any obvious holes or gaps.
- Mesh Analysis Tools: Use software like MeshLab, Netfabb Basic, or the mesh repair tools built into your slicing software to identify and highlight errors.
Repairing Mesh Errors
- Closing Holes: Most mesh editing software provides tools to automatically close small holes.
- Removing Overlapping Faces: Delete or merge overlapping faces to create a clean surface.
- Flipping Normals: Ensure that all surface normals are pointing outwards. Inverted normals can cause issues during slicing.
Tip: Regularly check and repair your mesh throughout the design process to avoid accumulating errors.
3. Software Selection: CAD, Sculpting, and Slicing
The right software is crucial for creating and preparing your 3D models.
3D Modeling Software
- CAD Software (e.g., SolidWorks, Fusion 360, AutoCAD): Ideal for creating precise, parametric models with defined dimensions. Suitable for engineering and manufacturing applications.
- Sculpting Software (e.g., Blender, ZBrush): Best for creating organic shapes and artistic models. Offers more flexibility in shaping and detailing surfaces.
- Mesh Editing Software (e.g., MeshLab, Netfabb): Used for repairing, optimizing, and modifying existing 3D models.
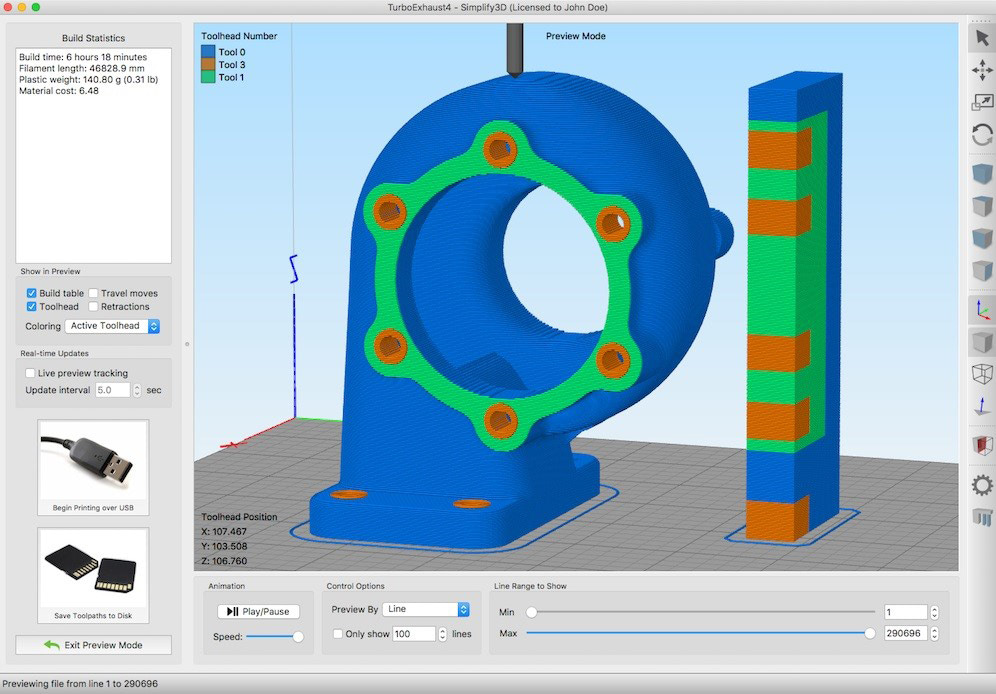
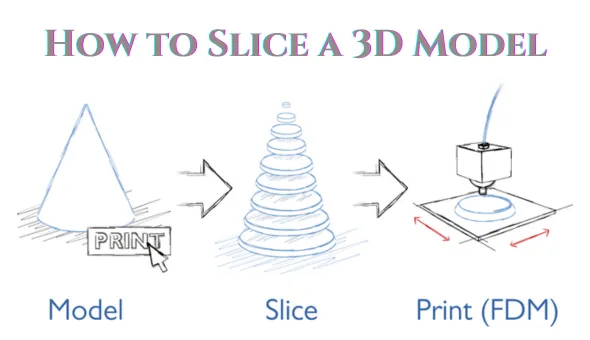
Slicing Software
Slicing software converts your 3D model into a set of instructions (G-code) that the 3D printer can understand. Popular options include:
- Cura: Free and open-source, widely used and highly customizable.
- PrusaSlicer: Another excellent open-source option with advanced features.
- Simplify3D: A paid option with advanced control over slicing parameters.
4. Design Considerations for 3D Printing
Designing for additive manufacturing requires considering the limitations and capabilities of the 3D printing process.
Wall Thickness
Ensure sufficient wall thickness to provide structural integrity. A general rule of thumb is to use a minimum wall thickness of at least two extrusion widths, typically around 0.9 mm. For FDM 3D Printing, make sure your walls are thick enough.
Overhangs
Overhanging structures require support material to prevent sagging. Design your model to minimize overhangs or incorporate self-supporting features. Generally, overhang angles less than 50 degrees are printable without supports. Modern printers can reasonably handle up to 70°.
Support Structures
When supports are necessary, optimize their placement and density to minimize material usage and post-processing effort. Consider using soluble support materials for complex geometries.
Orientation
The orientation of your model on the build plate affects print time, surface quality, and strength. Choose an orientation that minimizes support material and maximizes the strength in critical directions.
Tolerances
Account for dimensional inaccuracies inherent in 3D printing. For parts that need to fit together, design with appropriate clearances. A clearance of 0.2 mm is recommended for loose fits, while 0.1 mm is suitable for tight fits.
5. Slicing Parameters: Fine-Tuning Your Print
Slicing parameters significantly impact the quality, strength, and printing time of your parts.
- Layer Height: Lower layer heights result in smoother surfaces but increase print time. A typical range is 0.1 mm to 0.3 mm.
- Infill Density: Controls the amount of material inside the part. Higher infill densities increase strength but also increase material usage and print time. A range of 15% to 50% is common.
- Print Speed: Affects print quality and adhesion. Slower speeds generally result in better quality but increase print time.
- Temperature: Adjust the nozzle and bed temperatures according to the filament manufacturer's recommendations.
- Support Settings: Optimize support density, overhang angle, and interface layers for easy removal and good surface finish.
Note: Experiment with different slicing parameters to find the optimal settings for your specific printer and material.
6. Export Settings: Balancing Detail and File Size
When exporting your model to STL, adjust the export settings to control the level of detail and file size.
- Chordal Tolerance: The maximum distance between the original surface and the tessellated approximation. A smaller chordal tolerance results in a more accurate representation but a larger file size. Recommended value is 0.01 mm to 0.1 mm.
- Angular Tolerance: The maximum angle between adjacent triangles. A smaller angular tolerance also results in a more accurate representation and a larger file size. Recommended value is 1 degree.
Tip: Aim for a file size that is small enough to be easily processed by your slicing software but large enough to capture the necessary detail. Try to keep your STL file size below 20MB.
7. Common Mistakes and How to Avoid Them
- Non-Manifold Geometry: Ensure your model is watertight before exporting.
- Scaling Issues: Double-check the units and scale of your model before printing.
- Insufficient Wall Thickness: Design with adequate wall thickness to ensure structural integrity.
- Incorrect Support Placement: Carefully plan the placement of support structures to minimize their impact on the final part.
- Poor First Layer Adhesion: Ensure the print bed is clean and level for good first layer adhesion.
8. Post-Processing Considerations
Post-processing steps may be necessary to achieve the desired finish and functionality.
- Support Removal: Carefully remove support structures using appropriate tools.
- Sanding: Smooth the surface of the part by sanding with progressively finer grits of sandpaper.
- Painting: Apply paint or coatings to enhance the appearance and protect the surface.
- Assembly: Assemble multiple parts to create a final product.
Our 3D Printing Services can handle all aspects of your 3D printing needs, including post-processing.
Conclusion
Preparing your 3D files for printing is a crucial step in achieving successful results. By understanding the principles outlined in this guide, you can optimize your designs for 3D printing and create high-quality parts. For more information, check out our Knowledge Base for additional resources and guides.